|
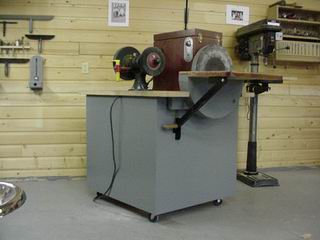
I had always wanted a sanding machine with a larger disk
you typically find on machines of this type. The trouble was they were so ridiculously priced and so lacking in size that I decided the only way I could have what I wanted was to build it myself.
Now, I know what you're thinking, "But Joe, you're a mechanical genius, it's so easy for you - I'll never be able to make something like this." Well, you may be right on the first part, but, really...this project is drop dead simple and a hoot to make.
Let's look at the bennies! Out of the deal you have an excuse to go scavenging for the necessary parts and in the end you'll wind up having a truly impressive woodworking machine.
Take a look...
The red box behind the disc houses a two-speed motor, which powers the bench grinder.
You'll see a little more of this further on.
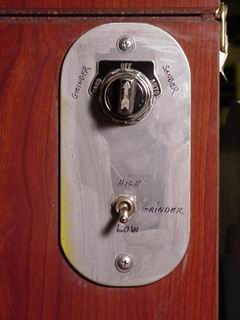
The switch assembly is a two position switch; turning it to the left powers up the grinder, turning it to the right powers up the disk. The switch at the bottom toggles the high and low speeds for the grinder.
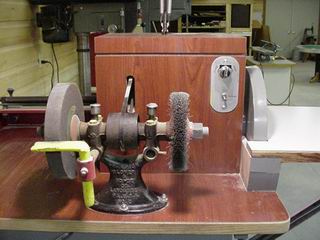
The grinder came from a previous trip to my favorite mall. So did the two-speed motor. It was actually part of the machine-from-hell that later came to be known as
Mrs. Wazooni. She's my
sitting scroll saw station,
which is another of my shop made machines.
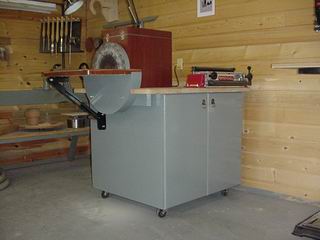
The door on the left houses the motor that powers the disk. The red box has two levels; the upper level holds the grinder motor, the lower level contains the shaft and pillow block bearing assembly for the sanding disk. The disk attaches to the threaded shaft by using Delta's 6" face plate, which is screwed onto the disk.
The hinged lid allows access into the grinder's motor area. And it is here where all the electrical connections are made to the switch for both motors.

Depending upon the size you make the cabinet, you can utilize the extra surface area of the top to mount accessories like this dovetail jig.

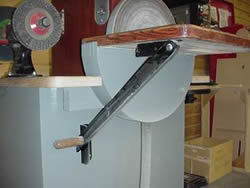
The table should be made so that it can tilt. Here I used a piano hinge and made the bracket so that I can simply loosen the knob to allow the shaft to slide down and into the cabinet.
The dimensions of the cabinet can be altered to fit your own design and I doubt you'll use the same components as I did. However, the pillow block assembly most probably will. A machinist can provide a shaft with 1" x 8 TPI right-hand threads on one end but be sure to order Delta's 6" lathe face plate beforehand. This way, you can give it to him so he can match the threads for the shaft so you get a nice tight fit. It's important to eliminate all possibility of vibration because of the disk's size and mass. I recommend using a 1 1/2" diameter shaft. Pillow blocks are available in any size.
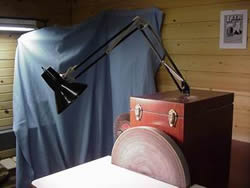
For all the obvious reasons, a task light was installed as an integral part of the machine. Here I simply placed it in such a manner that it can be easily swung to either the grinder or sander.
The disk is 16" in diameter and made up with two layers of 3/4" MDF. Next, a piece of aluminum highway sign is adhered to the core using spray adhesive. This makes a great surface for the sticky sanding disks to be easily removed. Finally, cut out the circle using your band saw and, if you don't already have one, my circle cutting jig. Once the disk in in place and the machine is turned on, you can true up the circle while it's spinning. If you have any questions Email me.
I'm afraid ole Rube
Goldberg is gonna have to eat his heart out again.
|