|
Over the years I've had many woodworkers contact me with questions about my router table and was surprised to find out how many were actually building theirs like mine. There are, however, those who built their tables based upon my design but sported a few changes. If you'd like to see your router table project on this page, then send ME a written description and a few pics and I'll gladly post it here. Please be sure to include your hometown and state. Each of their names is an Email link so if you have any questions for one of them simply click on their name.

Tom Miller - Norman, OK. - I searched around on the internet and came across the plans for building a router table designed by Joe Johns. I built mine out of birch plywood, ash and maple and used a Porter-Cable 3 ¼ HP router for muscle.
I basically used Joe's plans for the general dimensions and overall appearance, making some adjustments to accommodate my frame. I liked the idea of the light inside and incorporated that idea as well.
Of course, no woodworker likes to plagiarize the work of others so mine does have a nice fence of my own design. I can attach my shop-vac to the fence in a manner similar to Joe's design. However, I also incorporated into the top of the fence a Plexiglas window in order to observe the wood chips being sucked out of the way of the bit. This is a really nice feature as when the chip movement slows or begins to build, then I know the filter needs changed.
I've always been one to get under the hood and determined there may be a need from time to time to get into the carcass to adjust some doo-dad or another, or maybe even just to change the light bulb. Never one to get down on the floor and reach inside, I decided on making mine a flip top. I attached the rear of the top on a piano hinge so I can raise the hood and work on the carcass whenever the need arises.
Thanks for the design. I enjoy building my own equipment and enjoyed this project very much.
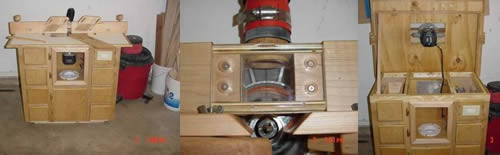

Dominic Palazzola - Madison Heights, MI. - I started out with a router mounted in the wing of a table saw and found it to always be counter productive during a project because it seemed I needed both tools at the same time and set up was a pain in the behind. Therefore, I started searching the net for router tables and came upon Joe Johns'. Joe's layout really impressed me, the clear door, the light on the inside and the dust collection were some of the key elements that I was attracted to. I changed a few dimensions and used Phenolic-coated Baltic Birch plywood from Woodpeckers for the top and fence.
One of the benefits of the light on the inside is the backlighting on the bit when routing. Yes, some may say the clear door is to show off the router but for me I can look inside and see if the compartment needs to be cleaned out which is almost never since the dust collection works so well.

Ron Odum - Mansfield, LA - Here are a few pictures of my Plain Jane router table. In fact, I think calling it a "router table system" is more appropriate.
I constructed mine of particle board and MDF. The slab is a piece of 3/4" and 1/2" MDF glued together giving me a hefty 1 1/4 thickness and topped with grey rock formica and trimmed in scrap walnut.
The carcass is 3/4 particle board and could stand a paint job. I had intended to use melamine, but caught the particle board on sale at the Big Orange joint. Drawers and door frames are various thickness MDF. Weight isn't a problem as with most everything else that isnt nailed down in my shop, its on wheels. Small Shop Tip...Put EVERYTHING on wheels!
I designed the table outright with the Incra Ultra system in mind, leaving a little extra room on the left, but not too much where it would be awkward to work on the side. I can also fit another homemade fence when needed. I used a Hart Design insert plate with a Router Raizer attachment and boy does this work swell!
The heart of the system is a 3 1/4 hp Hitachi 'Rice Cooker' MV12 router. So far it has worked quite well. Dust control is via a 4" central suction unit and auxiliary shop vac when needed.
A slight if not quite perfect improvement is the floor of my router cabinet. If you'll notice it is 'V'ed. This was supposed to help with the dust collection but in retrospect, I should have made the "V" with somewhat greater angles.

|