|
|
The New Twisted Knot Woodshop
& things you've always wanted to know about it
You might be asking the question, "Ummm, new? What happened to the old Twisted Knot Woodshop?" Well,
the building sits directly across the street from where it used to be. The old building was 32' x 48' and I sold it in 2001 because I thought it was
a good idea for us to move to Virginia (you can read the story HERE). When we got back
I decided a larger shop was needed. However, the funds from the sale had to be diverted elsewhere, which prevented me from immediately building
the new one. By 2003 enough funds had been saved for the concrete footings and foundation walls.
March 2, 2003 - Ground Breaking. Today Rich
and I began the construction phase by breaking ground with a skid steer loader. We took a lunch break and used the opportunity to fetch the transit, tripod
and grade sticks and when we returned the loader wouldn't start because of a loose wire on the starter. In the processes of tightening the nut, I dropped
the extension and socket and watched as it disappeared into the bowels of the machine. Luckily, we were able to lay down on the wet, cold ground and fumble
with a 75 lb inspection plate that was held on with 5 rusted bolts and remove it to reclaim the tool that was previously sucked into oblivion.
April 12, 2003
- Footings. It took a great deal of effort on my part to get the area ready to form
the footings. Today I started working on the footings. I can't afford to form them and pour them all at once so I'm going to do them in four
sections and each section will require 3 yards of concrete. These footings will be 16" wide and 12" thick and reinforced with 1/2" rebar.
June 17, 2003 -
Foundations walls are poured. At 2:30 PM the concrete pump, followed by a mixer truck
pulled into the site. For the previous nine days I worked non-stop on the forms and the only help I had was on Father's Day when I
scheduled a work party.
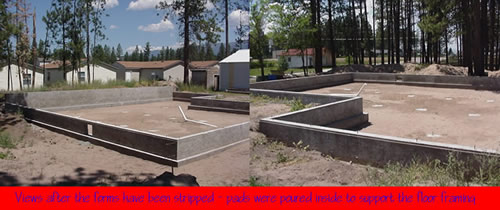
June 18, 2003 - Walls are stripped
and area cleaned up. I hate contractors who believe the crawl space area should also serve as a landfill.
I can't count the times I've entered one to find all manner of things left there by those boneheads; scraps of wood, soda cans, bent over nails,
you name it. After the forms were stripped I raked the entire area to remove all the concrete splatter left from the pour. It may not be perfectly
level but you won't kneel on something down there either.
The new shop will sit in the same spot as the old one however it will be larger; 55' x 48'. The white pipe sticking up is the sewer connection.
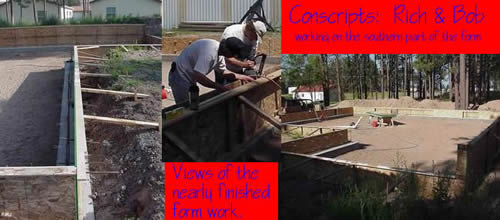
It took 34 sheets of 5/8" OSB to make up the forms. After it was stripped from
the walls it was stacked to be used later as sheathing on the roof and serving a double purpose.
It was a lot of work and I couldn't be happier with how they turned out.
However, it was a bittersweet moment as all construction came to a
screeching halt. The shop fund coffer was once again depleted and that
wonderful foundation would have to be put into a deep sleep to sit there, idle and beckoning until...?
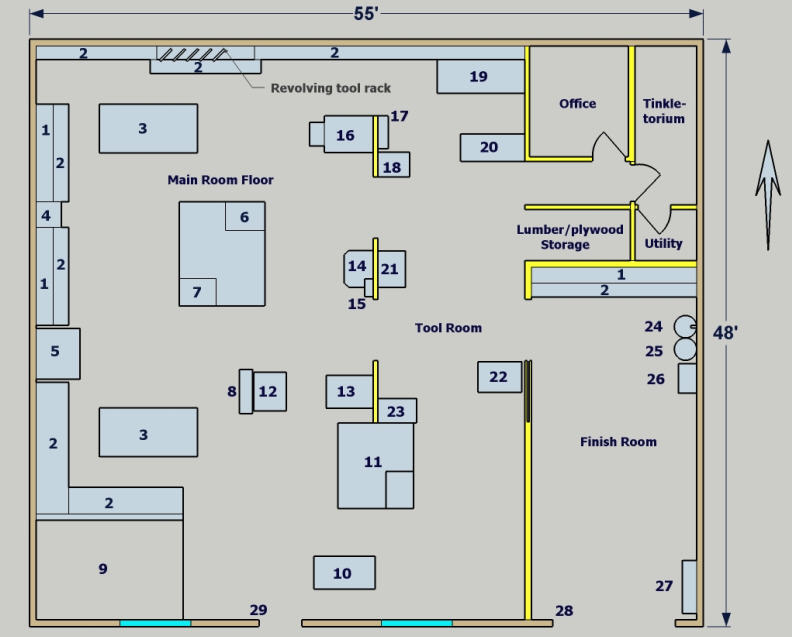
The size of the building was now set in concrete but I didn't have the slightest idea on a floor plan so I sat down and started
to draw them. I used everything; software (AutoCad, MS Paint, etc.), pads of paper, napkins, brown paper bags, the back of my hand, you name it, I used it
to begin laying out my future shop. I didn't have the slightest idea when enough money would be saved but what I did have was oodles of time and used it to
my advantage.
I took my oodles of time and began planning the shop. I wrote construction notes, contacted various material
manufacturers, added things and changed things. A good example of changing things is the door separating the finish room from the rest of
the shop; I went from a swinging door to a pocket door. I talked with woodworking friends, visited their shops and we discussed situations; "What would
you do differently if...?" Then I would, quite literally, return to the drawing board.
Placing all the equipment in there was my paramount concern because I wanted each machine to be fully accessible. I wanted some
of the amenities from the old shop and I definitely wanted an office and bathroom and the time spent on that drawing board proved to be enormously
beneficial.
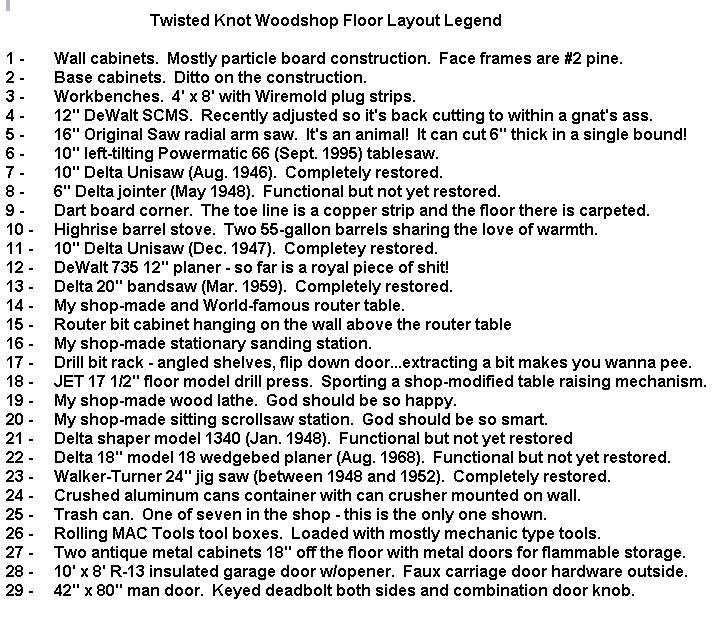
Now we fast forward to August 19, 2008, Construction Day! and this is the plan I finally settled on. Keep in mind things
in my shop migrate like wildebeests so what you're seeing now is merely chiseled in cottage cheese. I have been known to walk into the shop and move something
I moved yesterday and it's not that I'm a woman and can't make up my mind, it's because I'm always trying to improve the TKW and if that means having a
machine corps ball then that's what I'm having.
Electrical Tidbits
I'm not a licensed electrician but I've been doing electrical work since I was twelve-years-old. I've wired several houses,
at least six shops and changed out quite a few electric service panels and it came as no surprise to several of my friends who are real electricans
that I was wiring the new shop. I'm known as the "Black Knight Electrician"
24 - light switches
62 - 120-Volt outlets on eight dedicated circuits
11 - 240-Volt outlets on eight dedicated circuits
2 - Wire mold multi-strips on a dedicated circuit
30 - 2-bulb 8-foot flourescent light fixtures on three dedicated circuits
11 - 2-bulb 4-foot flourescent light fixtures on a dedicated circuit
2,500 feet of wire
400 feet of speaker wire
300 feet of RG-6 coax
75 feet of cat5E wire
2 dedicated knife switches
Carpentry Tidbits
I've been a carpenter since before graduating high school in 1978. I was sixteen and worked summers for my grandfather Matthew Pritt
and his brother, Lee Pritt. At that stage I was a carpenter's helper and made it a point to watch, ask questions and learn. I've been
very fortunate to have had extraordinary mentors over the years and remember fondly those I've had the extreme pleasure of working alongside.
When construction began on the shop I had one other real carpenter along with a host of very generous family
members and special friends who were eager to help and without them the new Twisted Knot Woodshop would certainly not exist.
A building of this size, if I had hired a construction company, would have cost right around $118,000.00. As of this day,
Thanksgiving Day, November 25, 2010 the total materials and extraneous expenses are $30,033.03
People who place no value on family and friends are very blind indeed. However, I am not a taker and I appreciated their
assistance immensely so I will not see their help going unrewarded - each of them are welcome to use the shop at any time. If you'd like to see
a list of them and the phases of the construction they were involved with then go
HERE
I can positively state my shop will never be done. I feel that is the honorable way to look at a woodshop. And, I feel
the moment you believe it is, then you are done. |
|
|