|
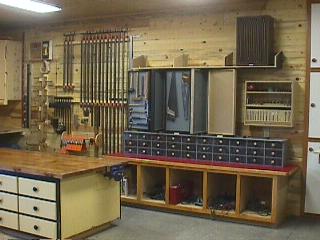
It was a dark and dreary day and the weather outside wasn't too great either when I realized something must change with the way I stored my handtools. They were hanging on walls, languishing in drawers and loafing in cabinets. And, the trend would have continued if I hadn't designed this snazzy rack to store them.If your wood shop suffers with this kind of mayhem and your desire is to gain control of your tools, then this simple shop project just screams out for you to build. The next thing to consider is how you'd like to support your tool
rack and the options available to you are varied. You could
use a cabinet or some form of drawer system, or perhaps something
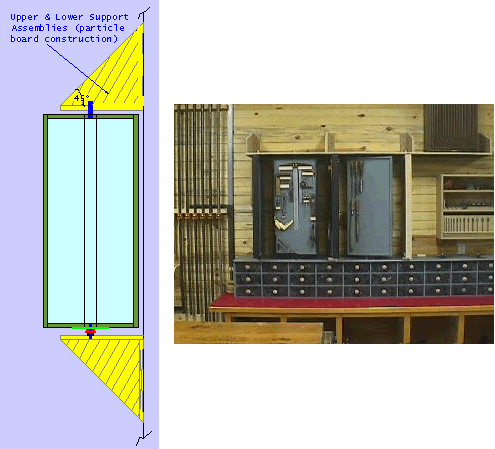
like this drawing. It's an exact reverse of what I used for
the upper section, whose sole purpose in this case is to provide
a pivot point for each of the panels. This simple upside-down
shelf has attached plywood or particle board brackets that are
screwed to the wall. The pivot pin is merely a 3/8" wooden dowel.
What's so special about this contraption and how does it work?
Well, for starters I get 40 square feet of storage in slightly more than 16 square feet of actual wall space used. But, how it works is the really special part. Take a look...
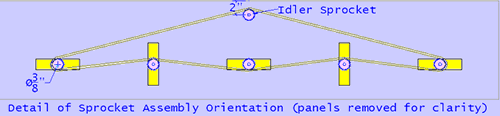
Pretty spiffy, huh? You see, by connecting each panel with a sprocket and a continuous chain, I was able to get each and every panel to turn at the same time and in direct but opposite relation to its neighbor.
Let's see how the sprockets are fashioned.
.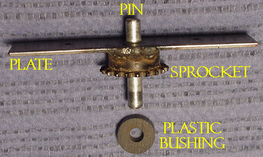
The pin is 3/8" in diameter and 2 1/4" long. The plate is strap steel 1/16" thick x 1 1/2" wide x 6" long with a mounting hole drilled at each end. The plastic bushing is there to keep the sprocket from wearing anything out and is inserted between the sprocket and the supporting cabinet or shelf - it doesn't have to be anything fancy. However, it must be thick enough so that the chain doesn't rub against things either.
In the center of the plate drill a 3/8" hole to accept the pin. Next, insert the pin through the plate and use it as a guide for where the sprocket will sit, then weld the sprocket to the plate. The sprocket is equipped with a set screw - allow the pin to extend past the plate 1/2" and tighten the set screw.
Now we'll take a look at the panels.
The first thing you must determine is how much space you're going to need. The easiest way to do this is to lay out all the tools you intend to display on the surface of your workbench. By placing them just so, you should be able to get a feel for how big your panels need to be and how many are needed. Mine ended up being 5 panels, 16" wide and 36" high. It should be noted that an odd number of panels must be used in order to take advantage of the unique operation of this tool rack. Also, you may want to plan for the future by allowing for more space than you actually need today.
My panels were made with 1/2" MDO for the inner core and the outer frame being 3/4" MDF. I choose these two products because of their stability and for their painting ease. The outer frame is 2" wide with a 1/2" groove through the center of their lengths- this is to accept the MDO core. I used butt joints throughout and glued and nailed the frame to the core.
After your panels are built drill a 3/8"hole in the center of the bottom and top of each panel's frame to accept the pivot pins. The next step is to install the sprocket assemblies - be sure the sprocket is facing away from the bottom of the panel. Secure each sprocket assembly to a panel with an 1 1/4" screw through each of the mounting holes.
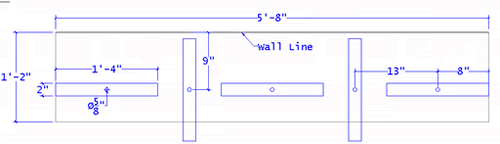
It's important to situate your panels properly: too close and stuff you have displayed on them may interfere with other panels. Too far apart and you're wasting space. The above drawing is how my panels are laid out dimensionally. Whether your panels are wider or narrower, orient them this way when it comes time to connect the chain.
You can't push a chain.
It will be the natural tendency for someone to grab any of the central panels and turn it. And, it is here, where the forces of inertia will interact, causing that particular panel to skip a cog...unless you use a snubber. In my case, the snubber is simply a piece of hardwood that was cut with a slight radius and installed to keep the chain pressed tightly against the sprocket. Other types of materials, such as UHMW or PVC plastics would work equally well, too.
Sources of Supply.
MDO & MDF: lumber and building yards, home centers
Strap steel: welding shops, metal supply houses, hardware stores
Steel pins: home centers, hardware stores, auto parts stores
Sprockets and Chain: I don't know if your locale has a bearing supply house like I have access to here in western Montana or the same helpful people sitting behind the counter. If not, feel free to either Email Jeff Hunt at U.S. Bearings in Missoula, Montana with your order. Or, call 800-221-9023.
The sprocket part number is: 25B20 3/8
The chain part number is: 25 Chain (10' per box)
How'd ya do?
Often others will see things differently and expand on it or simply build it the way the designer did. In each case, something will generally come out that can be of interest to others who decide to make it. Whether you take the road less travelled by or follow my lead, I'd appreciate hearing from you. Email me with whatever you encounter.
Stick Around.
If my article in Fine Woodworking magazine led you here and you've never visited my Web site before, then stick around and explore the rest of my humble web site. |