By now you should have completed
your base and wall cabinets so let's take a look at how I make
C-tops. But first, let's go over my rules.
I use standard grade particle
board
I use quality laminates
I ONLY use 3M's 30-NF contact
adhesive
I NEVER put laminate on the
edges - I don't care who you are or how much you're paying me, I
won't do it.
I NEVER cut holes for sinks,
cook-tops or whatever until after the cabinets are installed and
the C-tops secured
That's it! Let's move on.
Tools you'll need:
A tablesaw - yes,
you could cut the parts with a circular saw but a TS is faster and
more accurate
A 1/4" crown stapler
capable of shooting 1 1/2" and 1 1/4" staples
A brad nailer capable of
shooting 1 1/2" brads
An air compressor
An air blowing nozzle
A planer
A try square
A miter saw
A hammer
A pair of dykes
A pencil
A pencil sharpener
Lighting
Electricity
A workbench
A bottle of yellow Carpenter's
glue
A small dish
An 1 1/2" chip brush
A belt sander
A paint roller handle equipped
with a foam roller
A roller pan
A J-roller
A dust brush
50 grit sanding belts
A router with flush cutting
and 45 degree chamfering bits
Before we go further I want to share a little
word with you about the adhesive. It has 3M's name on it so that means
it's pricey but it's worth every penny. It's latex, which means it is
water-based and when dried it is like a rubber glove. It really is tough
stuff and sticks like nobody's business. The "NF" means non-flammable
On the label you'll be instructed to clean whatever brushes, rollers and pans
that contacted this adhesive with Pinesol. My instructions are to ignore
those instructions and throw the cheap foam roller away - it just ain't worth
the trouble or the expense of Pinesol. I do use a pan liner but I don't
throw it away, I just keep reusing it until layer upon layer of rubber
accumulates and begins to weigh somewhere around 20 lbs. If I'm doing
something small I use an 1 1/2" chip brush then throw it away. After you
pour an amount of adhesive into the pan close the container. If you leave
the adhesive out too long or the container open it'll film over - DO NOT pour it
back into the container without first skimming off this film! If you
ignore what I just told you then the next time you pour some out there'll be
rubber boogers. Your roller doesn't know the difference and picks them up
and then transfers them onto what you're gluing. Now you get to spend a
little while (generally 16-hours) picking them off. If you don't, they'll
telegraph through the laminate. This adhesive can be used for other
applications; I've used it to adhere paneling to drywall, pieces of metal,
fabrics...it's fun stuff.
Your first step is to determine what type of
C-top you need and you should easily be able to determine this from your cabinet
layout drawing (you do have one of those, right?). There are four types:
Finished end
Non-finished ends
Island
Peninsula
Finished end C-tops come in two
flavors; left and right. Island C-tops are finished on four
sides and Peninsula C-tops are finished on three sides. I'm
going to walk you through making a FER or finished end right C-top.
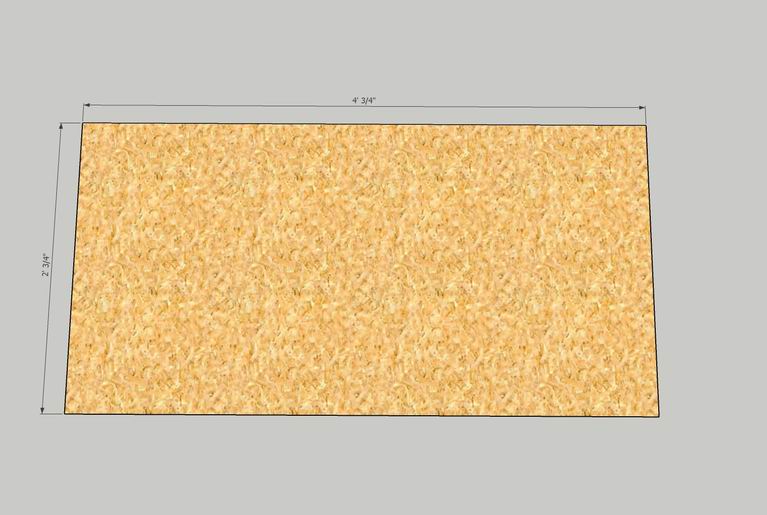
Cut the particle board to size.
In this case we're going to make a C-top that will fit on a 4' long
base cabinet. I allow for 1 1/2" overhangs at the finished
ends and along the cabinet fronts. Right now this substrate is
only 3/4" hanging over - don't worry, we'll get there.
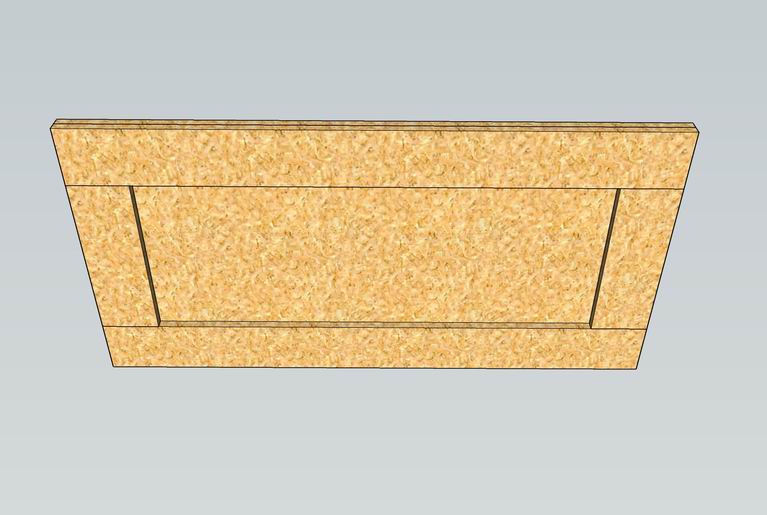
The next thing to do is give your
C-top the illusion of being 1 1/2" thick without making it heavy.
To do that I staple (be sure to use 1 1/4" staples here) 5" wide
strips of particle board around the perimeter of the C-top. Be
sure to do the longest ones first then fill in the others.
Another reason for doing this comes when it's time to secure the
C-top to the base cabinet. Remember the corner blocks you
installed and the holes you drilled in them? Well, using a 2"
long drywall screw there guarantees the screw won't blow through
your finished C-top.
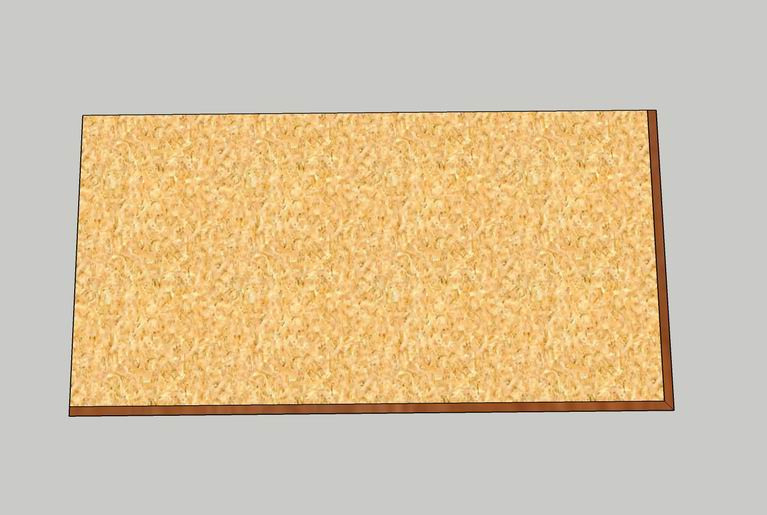
Here's where it starts to get
pretty. On all finished ends and visible edges I glue on
strips of 3/4" x 1 9/16" matching the wood species being used on the
face frames, doors and drawer fronts. Cut the edging to length
being sure to miter the corners. Pour some glue into the dish,
add a little water and mix it. You want a consistency where it
drips off your brush easily - you'll know if it's too thin.
Working one edge or end at a time, brush the glue onto the substrate
making sure to saturate the particle board then grab the strip.
If you followed my directions, you should have milled the edging to
1 9/16" wide. This is because I have found it's easier to
leave the top and bottoms edges a little proud of the substrate and
sand it down than it is to flush it, try to hold it tightly, nail it
and hope it doesn't move. Brad nail all the edging and wait
about 30 minutes for the glue to set.
In the meantime, get out your belt
sander and equip it with a 50 grit belt. Take a pencil and
make tick marks across the edging and onto the substrate - do so
every couple inches being sure to place several of them at the
mitered corner.
From this moment on you need to
keep your woodworking game face on. If you screw up any of the
following steps you might as well start over.
Turn the C-top over so that the
bottom is up and repeat the tick mark procedure. These tick
marks are your sanding guide and the purpose of them it to let you
know when the edging is perfectly flush with the substrate.
When the tick mark disappears entirely then you best be moving the
sander. DO NOT sand from the edge - keep the bulk of the
sander on the field. DO NOT hold the sander in one place -
keep moving it back and forth. DO NOT stop at the corner, arc
the sander around it. Repeat for the top - sand the edging
first then lightly sand the field to create a scuff. Take your
blower and in concert with the dust brush, brush and blow from one
end to the other.
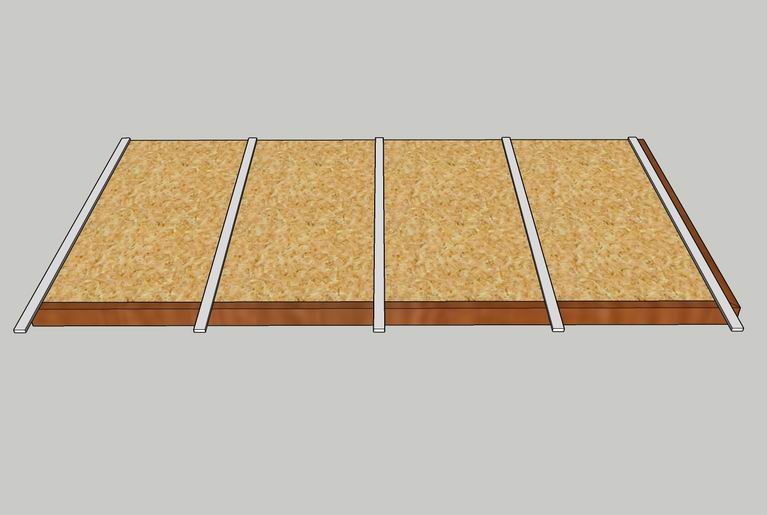
It's time for the fun part -
gluing down the laminate. Mill out some strips 1/4" x 3/4" by
28" long - you need one for every foot of run and set on your
workbench next to the C-top. Lightly sand the cut edges to
remove any burrs. Cut your laminate to size
allowing one inch extra each direction. You have to be careful with
laminates over 4' wide - they are very tough through thickness but brittle along
the length. Pick wide sheets up along the longest edge using your
fingers only...no thumbs. Look at your hands...no, really, I
want you to look at your hands. Now, fold your fingers against
your palms with your thumbs sticking out like your hitchhiking -
that's the way you pick up laminate - between your fingers and your
palms only.
Whether I cut laminate on the TS
depends upon the length - anything over 6' I cut on the floor using
a circular saw with cardboard lying on the floor. The laminate
is good side down so the cardboard protects it and protects you from
cutting lines in your floor. Be sure to set the depth of the
blade properly. You cut good side down to keep the
laminate surface from chipping. If you use the TS then cut
good side up.
Put the laminate on top of the
substrate glue side up. Pour some
contact adhesive into the roller pan and begin rolling it onto
the laminate. DO NOT get over zealous, do not press hard, do
not roll fast. If it foams up you're rolling too fast.
You have plenty of time with this stuff so take your time and make
sure to coat the entire piece. Move it aside but elevated on
something so it stays out of sawdust but mainly to keep the adhesive
on the edges from sticking. Repeat for the substrate.
You are ready to put down the
laminate when the adhesive dries to where you can place the back of
your hand on it and it doesn't feel wet and doesn't stick. In
a warm shop it's about 20 minutes. Now pick up your stickers
and place them about a foot apart. Pick up the laminate and
lay it edge first on top of the stickers then carefully lower it
down. Slide the laminate back and forth until it's about 1/2"
proud all the way around. Gently lift up one end and slide the
end sticker half-way towards the next sticker. Using your
hands, press down the end about mid-way to the sticker. Get
your J-roller close and set it down on the bench - using your other
hand, pick up the laminate from the other end and remove all the
strips, grab the J-roller and start rolling from the previously
stuck end. Roll it back and forth while slowly lowering the
laminate. When the last inch is down, roll the snot out of it,
especially along the finished ends and edges.
Use a flush cutting router bit to
trim the laminate to the substrate. Keep the roller bearing
free of adhesive or else the cut will be jagged. I go over the
cut twice.
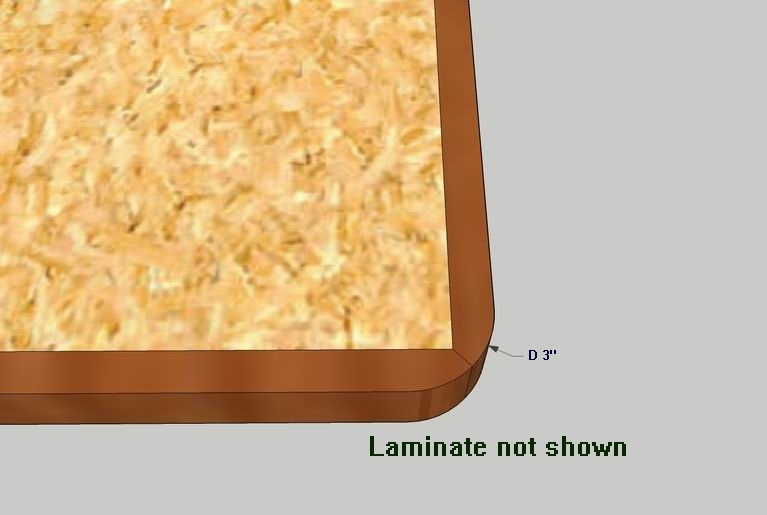
Next, draw a 3" diameter circle on
the corner and use the belt sander to knock off the corner.
The try square will let you know if you're not holding it straight
up and down. Sand to the line. Outfit your router with
the chamfering bit and run it along the finished edge and end.
I hand sand the chamfer but use the ROS for the rest.
I did these videos to show how you how to make your
own countertops.
"It's hard to plane a door when you have to use the crack of your ass for a vise" Scott Shepherd, 1980.